Instructions cover all Infiniti G37 models
The following directions are for replacing the factory exhaust with a cat back exhaust system. The vehicle is a 2008 Infiniti G37 Sport Coupe with an Invidia Gemini exhaust system. Similar steps can be used for all G37 coupes and should also be similar to previous-generation G35 coupes. Steps G35/G37 sedans are not much different other than the sedan has two seperate mufflers instead of the joined-muffler configuration of the coupe.
|
Parts Supplied By:
 |
|
|
Tools needed: Car jack, Jack Stands (or lift), 14mm deep-well socket, 12mm socket, 17mm socket, socket extention, ratchet, 14mm wrenches, WD-40 style lubricant. Breaker bar preferred
|
|
|
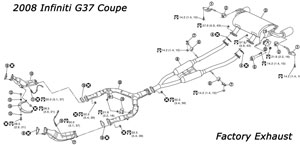 |
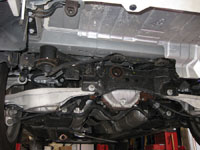
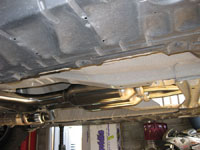
The image to the left is the layout of the factory exhaust and will be referenced via these instructions. Deinstallation starts at the back of the catalytic converters and we moved backward to deinstall the factory exhaust system..
|
|
|
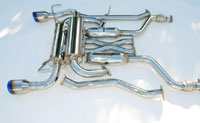 |
Exhaust The Invidia Gemini system is composed of 4 sections. The front section consists of two separate pipes which connect to the catalytic converters on one end and to the Crossover Pipe (section 2) on the other, The Crossover Pipe connects to a pair of mid-pipes (section 3) which extend to the final section, the Muffler. The exhaust tips are separate and need to be installed after the muffler section has been bolted up. In total, there are 6 pieces to the Gemini. Additionally, the kit comes with 6 gaskets, 12 bolts, 12 nuts, the exhaust tips and a pair of flanges to mount the tips. Invidia does a supurb job of packaging the components and each are individually wrapped in plastic as well and the bags are labled to show passenger or drivers side. Very nice..
|
 |
Step 1. Safely jack up the car and set the car on jack stands. The more room you have, the better.
|
|
|
|
Step 2. Start the removal of the factory exhaust by removing the 14mm nuts from the catalytic converters on one end ( 18 ) and the merged section on the other ( 21 ). Refer to the above diagram for locations. To remove the section, gently pry the flanges apart at the catalytic converters, be careful not to damage the factory gaskets since these will be reused. Once both sides are free you should be able to remove the y-pipe and set it aside..
|
|
|
 |
Step 3. Removeal of the factory mid-section. The mid-section is secured via two rubber straps and four 14mm nuts at the muffler section. Start by removing the 14mm bolts from the muffler connections (4) and separate the pipes from the muffler. Next, using a 12mm socket with an extender, remove the two bolts that hold the bracket ( 7 ) with the rubber straps ( 6 ). The cross brace should help you keep the mid-section from falling down. Set the mid-section aside and remove the two brackets and rubber bushings for future use (see image to left). (
|
|
|
 |
Step 4. Remove 3 of the four 12mm bolts that hold up the brace. Loosen the third one 1/2 way so it can be swung out of the way to install the new exhaust. This step may be skipped but I found it easier to install the exhaust with it out of the way.
|
|
|
 |
Step 5. The factory muffler section is supported with three rubber straps ( 2 and 5 ). The front bushing ( 5 ) is held in place with a 14mm bolt, remove this bolt. The rear rubber straps ( 2 ) can be removed with some strength and flexibility. The Service Manual states to remove the 14mm bolts which hold the factory hangers but there are body panels in the way. Instead, you can shoot some WD40 on the mounting pin and work the rubber mounts off the muffler brackets as this saves a couple steps. Once complete you can set the muffler section aside. Now, time to install the new exhaust system :)
|
|
|
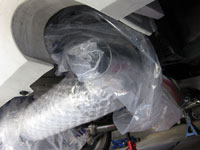 |
Step 6. The new exhaust is reinstalled in reverse order. It should be noted that the Invidia Gemini does not use rubber mounting strap #5. Since the Gemini is polished we left the plastic and bubble wrap on the muffer for installation. The muffler section is simply supported by the two rear rubber straps ( 2 ) and installation is relatively easy. Simply support the muffler and coax the straps over the mufflers two mounting hangers. Done deal! |
|
|
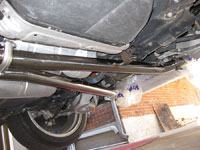 |
Step 7. Next, the Invidia mid-section pipes are installed. Attach the removed hangers and rubber straps that were removed from the factory mid-pipe (step 3) to each of the two mid-pipes. Take each mid pipe and mount the hangers back in their original locations (hangers and straps are #'s 6 and 7 on the diagram). With the pipes supported via the hangers/straps, use two supplied nuts and bolts with a gasket to affix each mid-pipe to the muffler. Leave the nuts loose for now. |
|
|
 |
Step 8. Install the crossover pipe to the mid-pipes. use two supplied nuts and bolts with a gasket to affix each mid-pipe to the crossover pipe. Leave the nuts loose for now. At this time, reinstall the cross brace that was "removed" in step 4. |
|
|
 |
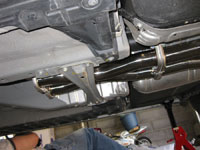
Step 9. Install each y-pip by starting at the catalytic converter and attaching there first. Reuse the factory gaskets and tighten the 14mm bolts appropriately. Once both pipes, which replaced the single factory y-pipe section, are installed, connect the other end of the pipes to the crossover pipe by using two supplied nuts and bolts with a gasket to affix each to the crossover pipe. Make sure the gasket is centered appropriately and tighten down the bolts. The flanges should meet evenly. Once this has been completed, go back over the bolts that were left loose and tighten them up appropriately to complete the exhaust portion of the installation. Use a knife or scissors to remove the packaging from the muffler section at this time |
|
|
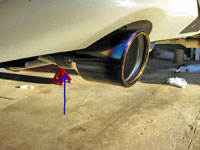 |
Step 10. The final step is to install the two tips. Slide the flange and the tip over each exhaust pipe. You can take this time to adjust the tips to make sure they are positioned evenly with the bumper and not twisted. Using a 17mm socket, tighten the flange to secure the tips. I made sure the flange bolt was near the top for a clean look. |
|
|
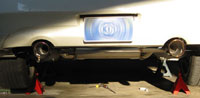 |
Testing. At this point, crank the vehicle and check for leaks. In most cases you can look for drops coming from the gasket connections dependant on the humidity. We actually had to adjust some of the connections to ensure a proper fit. We did have one that would drip somewhat regardless of what we did. After the road test the connection sealed itself and no longer dripped water. Take your time. When you are happy with the test the car can be removed from the jack stands. NOTE: After a test drive the car will smoke. After the first test drive there was enough smoke coming from the exhaust to look like a blown head gasket. Never fear, it will go away after the exhaust burns off manufacturing residue that is left behind from the manufacturing process. Enjoy your exhaust! |
|
|
Disclaimer: The author will not be held responsible nor held liable for any damages due to these instructions. Anyone following these directions are doing so at their own risk. This Documentation may not be distributed without the authors consent.
|

;)
;)
;)
;)
;)
;)
;)
;)
;)
;)
;)
;)
