 |
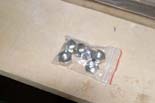
Contents: The package contained the strut bar with both mounts. The mounts were attached to the bar and wrapped solid. Also included with the bar is a package of 17mm nuts to be used when mounting the new bar. Start the installation by removing all packaging.
|
|
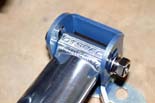 |
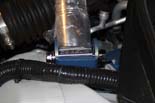
Build Quality: As can be seen in the picture to the left, this is no plain-jane strut brace off ebay. The build quality is excellent and there is attention to detail. The welds on the end of the bar show time was spent "doing it right". The brackets are strong and clean. The bar itself is quite light weight aluminum.
|
|
 |
Step 1. Disassemble the bar by removing the bolts from the brackets. Set the bolts and brackets to the side.
|
|
 |
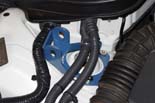
Step 2. I started on the passenger side and ran into a slight snag. The G37 has three electrical lines running over the section where the Strut Tower Bracket is supposed to mount and they are tied to the car. Two of the lines (yellow arrows) can be freed up by loosening the panel they pass through at the battery. To do so, remove the battery cover; use your nail or a small screwdriver and pop the plugs out and remove (see red arrows in image to left). This will allow the panel to slide up somewhat and allow the bracket to be more easily inserted. Using the 12mm socket, extension, and ratchet, remove the three 12mm bolts (as shown in This Image) and set them to the side.
|
|
 |
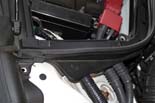
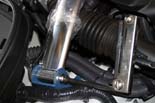
Step 3. Slide the bracket under the electrical lines and over the three bolts as seen in the image to the left. Take three of the supplied nuts and hand tighten them onto the bolts. The supplied nuts have a offset which is the size of the holes in the Strut Bar brackets so you will need to wiggle the bracket around to get all three nuts appropriately postitioned. Once they are hand tight, use the 17mm socket, extension, and ratchet to tighten the nuts back down.
|
|
|
Step 4. The drivers side allows for easy access so there are no panels to loosen. Remove the three 12mm bolts and install the bracket using the same steps as above
|
|
 |
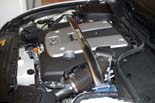
Step 5. Time to attach the bar. Lay the bar over the engine cover and attach to the brackets with the two bolts that were removed from the brackets before installation. The bolts should go in with the allen-head towards the front of the car for easy access. There should be a washer on the allen-head side and a washer + lock washer for the nut side. Insall bolts for both sides at this time.
|
|
 |
Step 6. Start on the drivers side to tighten the bolts down. The brackets have slotted mounts so you can adjust the height of the bar as needed. In the case of the G37 Coupe, all the way up is too high while all the way down is too low. I found the optimal position to be appx 1/4 from the bottom which allowed hood clearance without having the bar laying on the engine cover. Use the crescent wrench, or wrench of your choosing, along with the 8mm Allen wrench to tighten the bolts. When doing the passenger side, I actually use a screwdriver to stop the bar from rising while tightening; you will understand when you start tightening the bar on that end. |
|
 |
Step 7. Check fitment. Lightly close the hood and make sure it's not hitting the bar. Make adjustments as needed. When done, remove the plastic wrap from the strut bar, put the fastners back on the passenger side panel and reinstall the battery cover |
|
| Time and Difficulty. Total time for installing the bar was 30 minutes as I was being extra careful and taking pictures. This could be done in 15 minutes. On a scale of 1 to 5, the installation is simple and requires common hand tools so I would give this a 1.5 (easy). |
|
Disclaimer: The author will not be held responsible nor held liable for any damages due to these instructions. Anyone following these directions are doing so at their own risk. This Documentation may not be distributed without the authors consent.
|

;)
;)
;)
;)
;)
;)
;)
;)
;)
;)
;)
